Why I Make Chocolate (and How You Can Too!)
Posted August 21, 2026
People are really surprised to learn I make chocolate and ask me why.
The short answer is that making chocolate at home sounded improbable and fun. I like ambitious cooking projects. I like cool tools. The idea that I could start with a bag of fermented cacao beans and end with an actual chocolate bar seemed absurd.
But why am I still making chocolate regularly four years later?
I keep going because my homemade chocolate is far better than I expected. It has vivid, unusual, intense flavors that I rarely find - even in expensive craft chocolate. And it is cheap: less than a dollar in ingredients per 50-gram bar. Having kilos of high-quality dark chocolate sitting in my cupboard opens the door to a whole new world of chocolate desserts.
I also already loved good chocolate. When I lived in San Francisco, I would often walk to the Dandelion cafe, work there, and munch through a bar. Making it myself had simply never occurred to me.
The idea came during a tour of a vanilla farm in Hawaii. At the end, the owner casually offered us chocolate he had made from cacao growing on his own tree. I was shocked. I had assumed chocolate was a purely industrial product, far beyond the reach of a home cook. Yet here was one person making it from his own tree.
I asked him how he had done it, went home, and researched the process. Eventually I bought a melanger—a tabletop grinder with heavy stone rollers—and some pre-roasted cacao nibs, the edible centers of the beans. It just worked. I added the nibs to the melanger, and 24 hours later I had smooth, great-tasting chocolate.
Vivid Flavor
I expected making chocolate to be fun. I did not expect to make some of the most flavorful chocolate I have eaten.
Single-origin cacao—beans from one named origin or producer rather than a blend—can taste like fruit, flowers, nuts, caramel, or spice as clearly as it tastes like chocolate. Roasting turns those flavors up or down.
My chocolate often tastes more intense than bars from respected craft makers. I taste chocolate I roasted and ground at home and an expensive two-ingredient bar from the same named origin one right after the other. The origin is always recognizable in both, and the flavors are quite similar. The main difference is intensity: I taste stronger aromas in my version, while the commercial bar tastes muted.
Commercial chocolate covers two very different worlds. Mass-market makers need huge amounts of chocolate to taste familiar and consistent. They mostly use commodity cacao—large volumes of beans selected for price and consistency rather than the distinct flavor of a named origin—then use blending, recipes, roasting, and conching, a heated mixing stage that mellows flavor, to smooth out differences between crops and origins. A vivid expression of one harvest is not the point.
Craft makers such as Dandelion often buy the same sort of high-quality single-origin cacao I do. Between Dandelion and me, the difference is house style. Dandelion favors a very light roast and a long melanger run, while I prefer a controlled fuller roast and stop the melanger sooner. My roast develops more aroma and removes more acid before grinding; because I stop the melanger sooner, fewer of those aromas escape. Neither is the one true expression of the bean—I am just making chocolate for one customer, and I tend to prefer much more intense and unusual flavors than most people do.
Under a Dollar a Bar
The economics still surprise me. Good beans can cost $20 a kilo, and 300 grams of sugar costs about 80 cents. Account for the small amount of shell lost during winnowing, and a 50-gram bar still costs comfortably less than a dollar.
The ingredient cost is low enough that I can keep kilos of high-quality dark chocolate in my cupboard. I can experiment freely with the chocolate itself.
From a Good Batch to a Method
For the first year or so, I used pre-roasted nibs. They made starting easy, but I could find only a few origins and the nibs cost much more than unroasted whole beans. Eventually I wanted to roast my own.
Someone suggested using the oven. I had some success, but getting the same good roast twice was almost impossible. I bought a Behmor drum roaster—a coffee roaster that many chocolate makers also use—because I thought it would give me more control. Instead, my roasts got worse.
After a number of failed batches, I began researching cacao roasting in earnest. John Nanci’s writing at Chocolate Alchemy convinced me that I needed to measure the bean temperature during roasts to get good results. A friend drilled a port in the Behmor for a thermocouple, a fast temperature probe.
Chocolate Alchemy demonstrates the modification here. The probe reaches into the middle of the chamber, among the one-kilogram batch as the beans rotate. I connected it to Artisan, the open-source software coffee roasters use to record the temperature curve of each roast. My roasts improved at once.
After cooling the beans, I make chocolate and compare the result with the saved curve. Then I change one main thing in the next roast. With enough practice, I can often make the kind of chocolate I set out to make, and about 95 percent of my roasts are now good to great. Chocolate Alchemy’s introduction to profile roasting is what taught me to think this way.
I’m often a bit in awe that one plant can produce such complex and varied (and delicious) flavors. That’s perhaps what I enjoy most about making chocolate—each new batch is a surprise.
Appendix: A Home Maker’s Guide to Roasting Cacao
This guide combines John Nanci’s cacao-roasting experiments at Chocolate Alchemy, published research on cacao aroma, and what I have learned from my own batches. I preserved my longer research notebook in this cacao-roasting gist.
From Baking to a Roast Profile
When I bake a cake, the recipe tells me to set the oven to a temperature—say 350°F—set a timer, and wait. When the timer ends, the cake tells me whether it is done. I can see its color, feel whether it springs back, or insert a toothpick and see whether crumbs stick.
I can’t read cacao beans the same way. The bean shell doesn’t change color. The pleasant chocolate smell that fills the house is too vague to choose a stopping point. An acrid smell is useful, but only as a warning to lower the heat.
Adding a thermocouple changed my roasting. The probe samples the temperature of the moving beans, so I can stop each roast at a reproducible point: the end-of-roast temperature, or EOR.
But knowing when to stop is only half the problem. A cake bakes at one oven setting. With cacao, I change the heat throughout the roast to produce the rate of temperature increase I want.
That rate matters because I need each roast to do several things at once: develop wanted aromas, retain the aromas already in the beans, and remove enough acidity. Fermentation leaves cacao beans highly acidic. Much of that sharpness comes from acetic acid, the same acid that gives vinegar its bite. As the beans heat, acetic acid and wanted aromas escape. The longer they stay hot, the more of both I lose. So I control flavor with both the curve leading to EOR and the endpoint.
Before I had the probe, I could roast for a plausible amount of time and stop from rough sensory cues, but I could not see how fast the bean temperature was rising. I often flew through the final part of the roast, leaving too little time for the acid to escape. My chocolate was sharply acidic. Two roasts can stop at the same EOR and still taste very different because their curves are different.
Artisan plots the probe temperature over time. That line is the roast curve. It also shows the curve’s rate of rise: how many degrees per minute the temperature is climbing. Rate of rise is one of the biggest flavor controls in the roast.
I change the Behmor’s power during the roast to shape that curve. Power is what I put into the roaster; the probe temperature and its rate of rise show me how the beans respond. That response lags, so I have to reduce power before I want the curve to slow. Once I could see the slope, I could slow the final part of the roast on purpose.
The Three Segments
Chocolate Alchemy divides a profile at two useful landmarks: 212°F and 232°F. They divide the curve into segments whose rates are easy to compare.
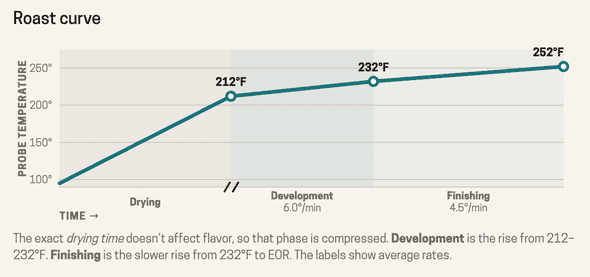
The sample curve ends at an EOR of 252°F. It rises at an average of 6°F per minute through development, then slows to 4.5°F per minute through finishing. The two rates and the EOR describe the roast.
Drying: set up control
The first segment runs from room temperature to 212°F. In Nanci’s comparisons, batches with drying segments from about 8 to 20 minutes tasted alike when their later profiles matched.
The practical aim is to arrive at 212°F with enough rate of rise to control what follows. If you approach too slowly, adding heat late may be difficult. If you charge ahead, stored heat may carry you into a surge. I use drying to enter the flavor-shaping part of the roast at the slope I want.
Development: set the flavor balance
Chocolate Alchemy finds the 212–232°F segment to be the strongest practical flavor lever. In its trials, shorter and faster passes tended to emphasize fruit and chocolate, while slower passes flattened the result. Excess speed could scorch the bean surface and add bitterness or astringency.
Astringency is the dry, puckering sensation that unripe fruit or strong tea leaves in your mouth. It is distinct from acidity, though a chocolate can have both.
Fermented beans already contain important aromas. Roasting strengthens some malty, floral, and caramel-like aromas, and evaporates or breaks down some of the aromas already present. See Frauendorfer and Schieberle and Rojas et al..
Finishing: remove acid and choose the expression
During finishing, I choose both how fast the temperature rises above 232°F and where to stop. A slower rate keeps the beans hot longer. When I take them into the high 250s and 260s, I get deeper chocolate, dried fruit, and caramel; near 270°F, I may get dark-roast and metallic notes.
During a slower finish, more acetic acid escapes and the centers of the beans have more time to heat through. But longer exposure to heat also removes wanted aromas. Higher EORs form deeper flavors; take the EOR too high, and bitterness, astringency, or metallic notes can emerge.
Chocolate Alchemy’s Piura Blanco trial tested this choice: as the EOR rose, its chocolate moved from bright passion fruit and apple blossom through softer dried fruit and raisin, then toward darker and metallic notes. You choose where to stop based on the bean’s flavors and the chocolate you want.
Cooling: end the roast
The roast continues until the beans cool. Cool them promptly to limit further aroma loss.
How Rate and EOR Shape Flavor
I think about the flavor balance this way:
finished aroma = what the bean brings
               + what roasting forms or intensifies
               − what roasting drives off or breaks down
I tune that balance with three controls: the average development rate, the average finishing rate, and EOR. I can interpret EOR only when I also know the two rates.
The same endpoint can hide very different finishing curves:
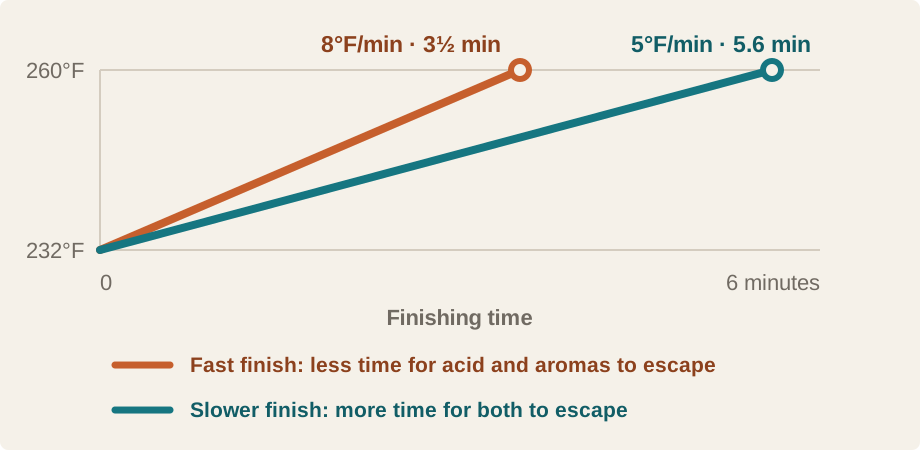
Both roasts stop at 260°F. At the slower rate, the beans spend about two extra minutes in finishing. More acid escapes, but so do more wanted aromas. That trade-off is what I tune.
My usual target is fruit-forward chocolate without excessive acidity. I use a fairly lively development segment to build strong fruit and chocolate aromas, then slow the finishing rise so more acid escapes without pushing the EOR higher than I want.
Why does EOR still matter so much? Each aroma has its own balance between formation and loss. In a 2019 study, hotter roasts lost phenylethyl alcohol, which smells floral, and benzaldehyde, which smells of almonds and cherries. Malty, chocolatey 3-methylbutanal first increased, then fell in the hottest roast because evaporation had begun to outpace formation.
Use the interactive map below to explore the three main controls. Development rate runs vertically, EOR runs horizontally, and the slider changes finishing rate. Select any point to see its profile in the curve below the map.
Open the visualization in a new tab
This map reflects my setup: a one-kilogram batch in a modified Behmor, with my probe placement and airflow. Another roaster or probe will shift the numbers, and an unusual bean may fall well outside the marked region. Treat it as a place to start, not a recipe. It will usually take a few test roasts—changing one part of the curve at a time—to find the flavor you want from a particular lot.
What You Need
You can start making chocolate with pre-roasted nibs. Profile roasting needs a controllable roaster and a useful view of how the batch heats.
| Item | Job | Notes |
|---|---|---|
| Behmor drum roaster | Supplies adjustable heat to a moving batch | Designed for coffee; I run it manually for cacao |
| Thermocouple and computer interface | Samples temperature among the moving beans | Mine reaches the middle of the chamber, among the rotating beans |
| Artisan | Plots temperature and rate of rise; saves the roast | Free |
| Premier Chocolate Refiner, 8 lb Hybrid | Refines nibs and sugar; also supplies heat and airflow | $340 current list price |
Establish a Baseline
Before tuning flavor, make the physical experiment repeatable. Keep these fixed:
- bean origin and lot, when possible
- starting mass—always ~one kilogram in my roasts
- probe position
- roaster and drum setting
- starting conditions
- chocolate recipe
- melanger time and temperature
- storage conditions
- time before tasting
A First Profile
Start with the profile selected by default near the center of the interactive map’s good-flavor region:
| Segment | Probe temperature | Average rate | Time |
|---|---|---|---|
| Drying | room temperature to 212°F | — | whatever your roaster takes |
| Development | 212–232°F | 8°F/min | 2:30 |
| Finishing | 232–252°F | 6°F/min | 3:20 |
For later roasts, use the interactive map above. Click the flavor region you want, adjust the finishing-rate slider, and copy the selected profile shown beneath the chart. The rates are segment averages. Artisan also plots a noisier live rate of rise; watch its overall direction instead of chasing every twitch.
How to drive it
- Start Artisan and confirm that the probe is reading normally.
- On the Behmor 2000AB, press 1 lb, then Start.
- Press P5 to enter manual mode at 100 percent heater power.
- Press D to switch the drum from standard to high speed.
- Use enough early power to approach 212°F with a higher rate of rise than you will want later.
- Before 212°F, lower power as needed so the curve enters development under control. Do not wait for the rate of rise to overshoot.
- Move through 212–232°F with a smooth rise. Avoid both a sharp acceleration and a long flat spot.
- Ease the rise again above 232°F. As a first rule, the finishing rate of rise should not exceed the development rate.
- Use the graph to steer the roast. If the smell turns acrid, reduce the power. Do not try to choose the EOR from the pleasant roast aroma; it is not precise enough.
- Cool the beans promptly.
- Make the chocolate without changing the rest of the process. Taste it, save the curve, and choose one main change for the next roast.
Use the target profile rather than a fixed P1–P5 sequence. The same button sequence can produce a different curve with a different load, bean, room temperature, voltage, or machine. Learn how your roaster produces the curve you want.
Roasting and Melanger Time
A small melanger refines and conches at the same time: its stones grind the particles smooth while its heat and airflow remove acetic acid and some wanted aromas. A 2024 study of industrial dark-chocolate conching found that higher temperatures made the chocolate flow more easily while reducing several desirable aroma compounds. See Guckenbiehl et al..
My approach is to roast until the bean tastes balanced without harsh acidity, then run the melanger only until the chocolate is smooth and tastes right. Dandelion chooses a lighter roast and says its three-day melanger run removes harsh flavors and mellows the chocolate. Dandelion describes its process here.
When learning, change the roast or the melanger time—not both. Once you understand each lever, you can tune them together.
Tune One Lever at a Time
| Goal | First change to test | Main risk |
|---|---|---|
| Fresher fruit or florals | Lower the EOR but keep a slow, complete finishing segment | Raw acidity or astringency if you simply cut the roast short |
| Dried fruit or deeper chocolate | Raise the EOR modestly while keeping the finishing rate controlled | Bitterness, metallic notes, or loss of fresh fruit |
| Preserve nut flavors without bitterness | For a bean dominated by nut and chocolate, hold finishing near 5°F/min and test an EOR between 248–252°F | Underdeveloped chocolate if the bean needs more heat |
| More fruit and chocolate from development | Shorten or steepen the 212–232°F pass within the working range | Surface scorch if the rate jumps too sharply |
| Less sharp acidity | Hold the EOR fixed and slow finishing toward 5°F/min; at 260°F, take about 5½ minutes from 232°F | Muted fruit if finishing runs much longer than six minutes |
| Less astringency | Hold finishing and the EOR fixed; lengthen development toward 3½–4 minutes, or about 5–6°F/min across 212–232°F | Flat flavor if development approaches or exceeds five minutes |
Change one part of the profile at a time. When testing development, match the observed finishing curve and EOR as closely as possible. When testing EOR, keep development fixed.
Read Failures as Signals
| Result | Check first | Next controlled test |
|---|---|---|
| Acrid smell during the roast | Power setting and rate of rise when the smell appeared | Lower power; on the next roast, make that reduction just before the same point |
| Scorched or metallic finished chocolate | A sudden rise in rate of rise; too much late power; uneven heating | Lower power earlier on the next roast |
| Raw, green, sharply sour, or astringent | Very low EOR; short finish; poor heat penetration; naturally acidic bean | Extend or slow finishing, or compare a less acidic bean |
| Flat or muted | Development that ran too long or had a long flat spot; old or weak beans; long or hot melanger run | Correct one segment or shorten the melanger run, not both |
| Same curve, different bar | Different lot, probe position, recipe, refining, storage, or tasting conditions | Repeat the same setup before changing the roast |
| Good flavor, rough texture | Insufficient refining or a recipe/flow problem | Fix texture without changing the roast |
Keep a small sample of roasted nibs. They will not taste like the finished bar, but they help show whether a difference appeared before or after the melanger.
Sources
Practical profile method
- Chocolate Alchemy: Introduction to Profile Roasting
- Chocolate Alchemy: The Drying Phase
- Chocolate Alchemy: The Development Phase
- Chocolate Alchemy: The Finishing Phase
- Chocolate Alchemy: Acidity and Roasting
- Chocolate Alchemy: How to Modify the Behmor Roaster for Profile Roasting
- Behmor 2000AB operation manual
- Dandelion Chocolate: How We Make Chocolate
Research behind the broad mechanism
- Frauendorfer, F., and Schieberle, P. (2008). Changes in Key Aroma Compounds of Criollo Cocoa Beans During Roasting.
- Rojas, M., Osorio, J., Heeres, H. J., and Chejne, F. (2022). Kinetic Studies on Cocoa Roasting Including Volatile Characterization.
- Guckenbiehl, Y., et al. (2024). Conching of Dark Chocolate: Processing Impacts on Aroma-Active Volatiles and Viscosity.
Glossary
- Acetic acid and acidity: Acetic acid forms during fermentation and gives vinegar its sharp smell and taste. Acidity is the broader sensory impression of sourness or brightness.
- Acrid: A sharp, prickly smell that tells me to lower the roaster’s power.
- Aroma and flavor: Aroma is what volatile compounds contribute through smell. Flavor is the larger experience, including aroma, taste, and mouthfeel.
- Artisan: Free roast-logging software that plots the probe temperature and rate of rise over time.
- Astringency: The dry, puckering mouthfeel associated with unripe fruit or strong tea. It is not the same as acidity.
- Cacao and cocoa: I use cacao for the beans, nibs, and raw ingredient. Cocoa remains in established terms such as cocoa butter and in paper titles.
- Commodity cacao: Cacao bought in large volumes for price and consistency rather than the distinct flavor of a named origin or lot.
- Conching: Mixing chocolate with heat and air to change its flavor, moisture, and flow. A small melanger refines and conches at the same time.
- EOR (end of roast): The probe temperature at which the roast stops. EOR matters, but the curve used to reach it matters too.
- Fermentation: The post-harvest process that creates many of cacao’s acids, aromas, and aroma precursors before drying.
- Fruit-forward: A chocolate in which fruit aromas are more prominent than deep roast, nut, or caramel notes.
- Lot: A traceable batch of beans from a particular harvest and processing run. Two beans sold under the same origin name may come from different lots.
- Melanger: A machine with heavy stone rollers that grinds cacao nibs and sugar into smooth chocolate.
- Nib: The edible center left after winnowing removes a cacao bean’s shell.
- Rate of rise: How fast the probe temperature is increasing, usually expressed in degrees per minute.
- Refining: Grinding cacao and sugar until their particles are too small to feel gritty.
- Roast curve and roast profile: The curve is the plotted probe temperature over time. The profile is the full planned or recorded curve, including its segments and EOR.
- Roast level: Terms such as light and fuller describe the overall degree of roast. They do not specify a complete profile.
- Roast segments: Chocolate Alchemy calls room temperature to 212°F drying, 212–232°F development, and 232°F to EOR finishing. These are practical landmarks, not separate chemical zones.
- Single-origin: Cacao from one named origin or producer rather than a blend of origins.
- Thermocouple: A fast temperature probe. Mine reaches the middle of the Behmor chamber among the rotating beans.
- Viscosity: Resistance to flow. Chocolate with lower viscosity flows more easily.
- Volatile compound: A chemical that evaporates readily. Many acids and aroma compounds in cacao are volatile.
- Winnowing: Removing the papery shells from cracked roasted cacao beans, leaving the nibs.
 Kyle Mathews lives and works in Salt Lake City building useful things. You should follow him on Twitter. Co-founder at Electric.